Plugin Docs
Bukkit Link: Grief Prevention Developers Docs: Documentation
How to claim:
AUTOMATICALLY PREVENTS ALL FORMS OF GRIEF, including build/break, theft, spam, fire, spawn camping, lava dumping, chat trolling, advertising and more, so you don't have to undo any damage after the fact. It even teaches players how to use it so you don't have to! No configuration or database required. Stop responding to grief and prevent it instead. Grief Prevention will solve your grief problems without requiring you to manage a roster of trained administrators, juggle 10 different anti-grief plugins, take away cool standard game features, publish a training manual / tutorial for players, or add explanatory signs to your world. You can also choose to integrate PvP elements into build design to finally get a PvP experience befitting a sandbox game about creative building.
Grief Prevention stops grief before it starts automatically without any effort from administrators, and with very little (self service) effort from players. Solve all your grief problems with a single download, no database, and no configuration step.
| Command | Description | Alias | Perm |
|---|---|---|---|
| /AbandonClaim | Deletes the claim you’re standing in. | claims | |
| /ClaimExplosions | Toggles if explosions are allowed in the claim. | claims | |
| /Trust | Gives another player permission to edit in your claim. | /t | claims |
| /UnTrust | Revokes any permissions granted to a player in your claim. | /ut | claims |
| /AccessTrust | Gives a player permission to use your buttons, levers, and beds. | /at | claims |
| /ContainerTrust | Gives a player permission to use your buttons, levers, beds, crafting gear, containers, and animals. | /ct | claims |
| /TrustList | Lists the permissions for the claim you’re standing in. | claims | |
| /SubdivideClaims | Switches your shovel to subdivision mode, so you can subdivide your claims. | /sc | claims |
| /RestrictSubclaim | Restricts a subclaim, so that it inherits no permissions from the parent claim. | /rsc | claims |
| /BasicClaims | Puts your shovel back in basic claims mode. | /bc | claims |
| /PermissionTrust | Grants a player permission to share his permission level with others. | /pt | claims |
| /Untrust All | Removes all permissions for all players in your claim. | claims | |
| /AbandonAllClaims | Deletes all of your claims. | claims | |
| /BuyClaimBlocks | Converts server money to claim blocks. | /BuyClaim | buysellclaimblocks |
| /SellClaimBlocks | Converts claim blocks to server money. | /SellClaim | buysellclaimblocks |
| /GivePet | Gives away a tamed animal. | givepet | |
| /ClaimsList | Lists a player’s claims and claim block details. | claims | |
| /IgnorePlayer | Ignores a target player’s chat messages. | /Ignore | ignore |
| /UnIgnorePlayer | Un-ignores a target player’s chat messages. | /UnIgnore | ignore |
| /IgnoredPlayerList | Lists all players currently ignored. | /IgnoreList | ignore |
| /Siege | Besieges a player (disabled by default). | siege | |
| /Trapped | Gets a player out of a land claim he’s trapped inside. | trapped | |
| /UnlockDrops | Allows other players to pick up items you dropped when you died. | unlockdrops |
SpigotMC Link: GPRealEstate Wiki
This plugin currently includes 3 different usage types : Selling, Renting and Leasing claims.
Selling a claim transfers it to the buyer once bought. The seller loses all his right over the claim once sold. By default, a player cannot sell subclaim, since it's impossible to transfer ownership over a subclaim.
To sell a claim, you simply need to setup a sign as follow :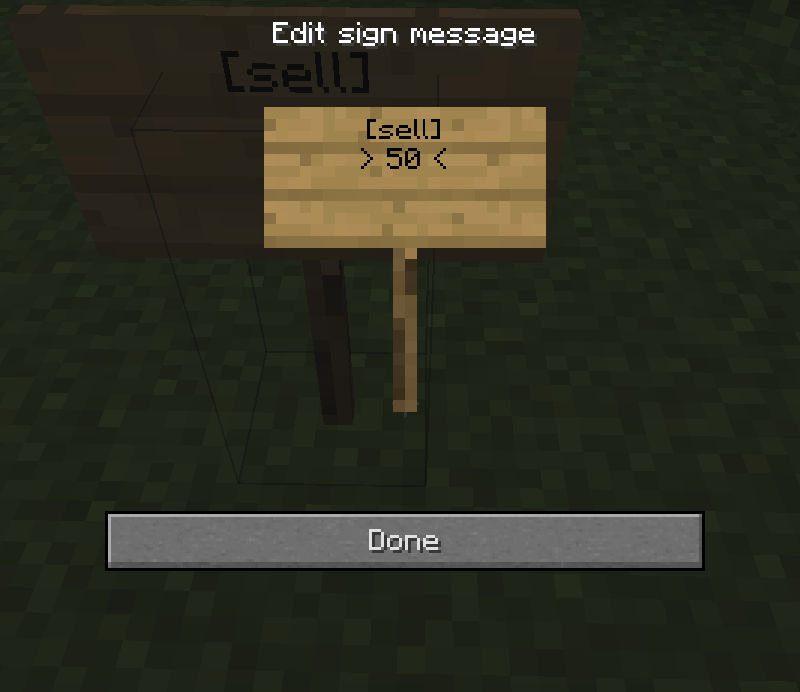
The sign will then change into a selling sign :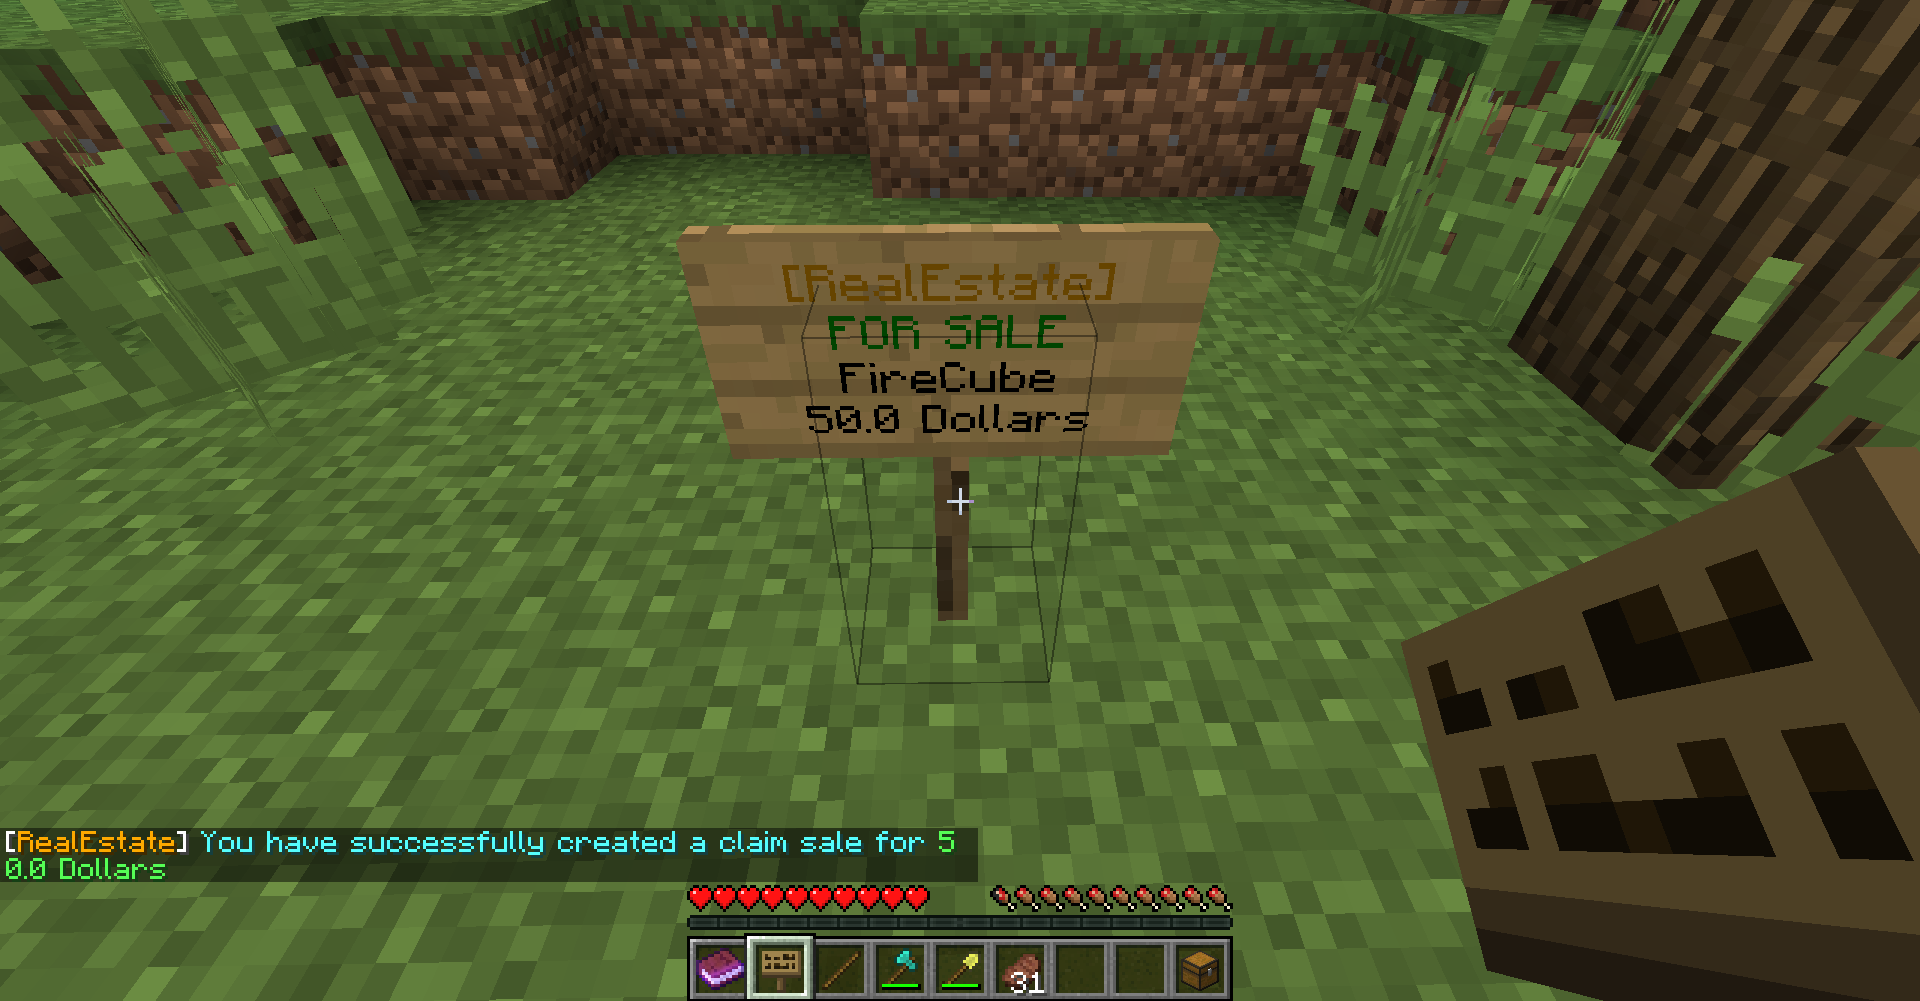
Anyone can then access the sale informations by sneak-right clicking the sign, and buy it by simply right clicking it.
Once bought, the sign is destroyed directly.
Renting a claim or subclaim gives the buyer build access for a given period of time. At the end of this period of time, the rent is either renewed, which leaves the buyer build access, or not, and the player loses all access over the claim.
To put a claim for rent, you need to write a sign as follow :
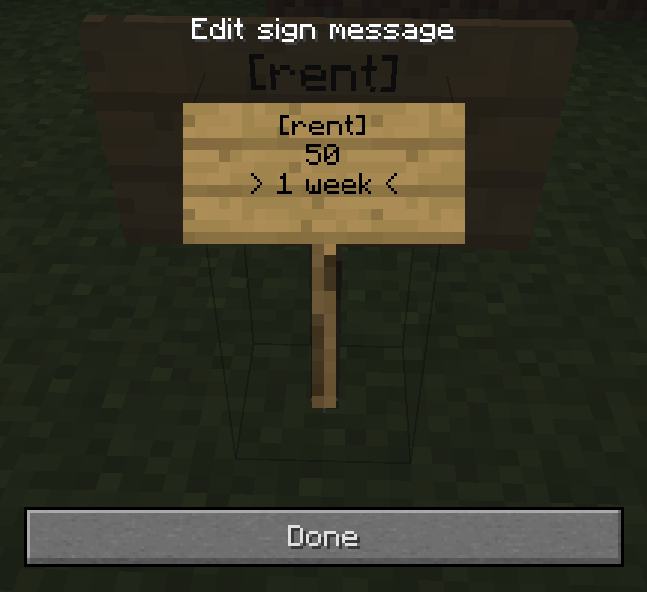
The format for the duration is simple, first the weeks, then the days :
- "1 week 2 days" means a total of 9 days
- "2 weeks" means a total of 14 days
- "3 day" means a total of 3 days
- "12w 5d" means a total of 89 days (12*7 + 5)
- "3d" means 3 days
- and so on...
Again, the sign will then turn into a rent sign, that can be used just as the sell sign above.
Once rented, the sign will indicate who is renting the claim, and until when. This could potentially change, depending on feedback and future evolutions already planned.
Automatic payments can be setup using the /re renewrent [enable|disable] command.
Leasing is close to renting, the difference being that at the end, the buyer gets to keep the claim. The lease is paid as multiple payments, split by a certain amount of time between each. If at some point, the buyer cannot pay (the payment is automatic), the lease is cancelled.
To create a lease for a claim, you only need to place a sign containing those informations :
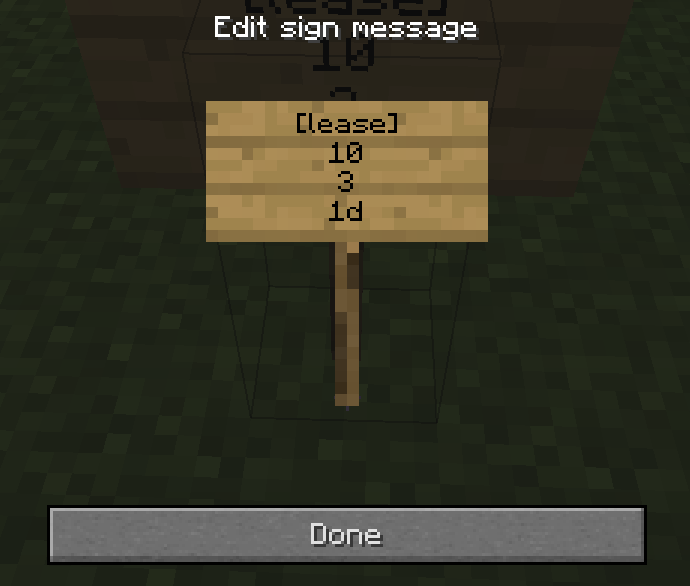
This indicates a lease consisting of 3 payments of 10 dollars, each separated by one day.
Again, sneak-right click for informations and right click to accept the lease contract. The sign will get destroyed as soon as someone accepts the contract.
SpigotMC Link: ChestShop 3.12.2
Using shops
How to create a Player Shop
- Place a chest on the ground
- Place a sign 1 block away from the chest (for example, above it)
- On the sign, write:
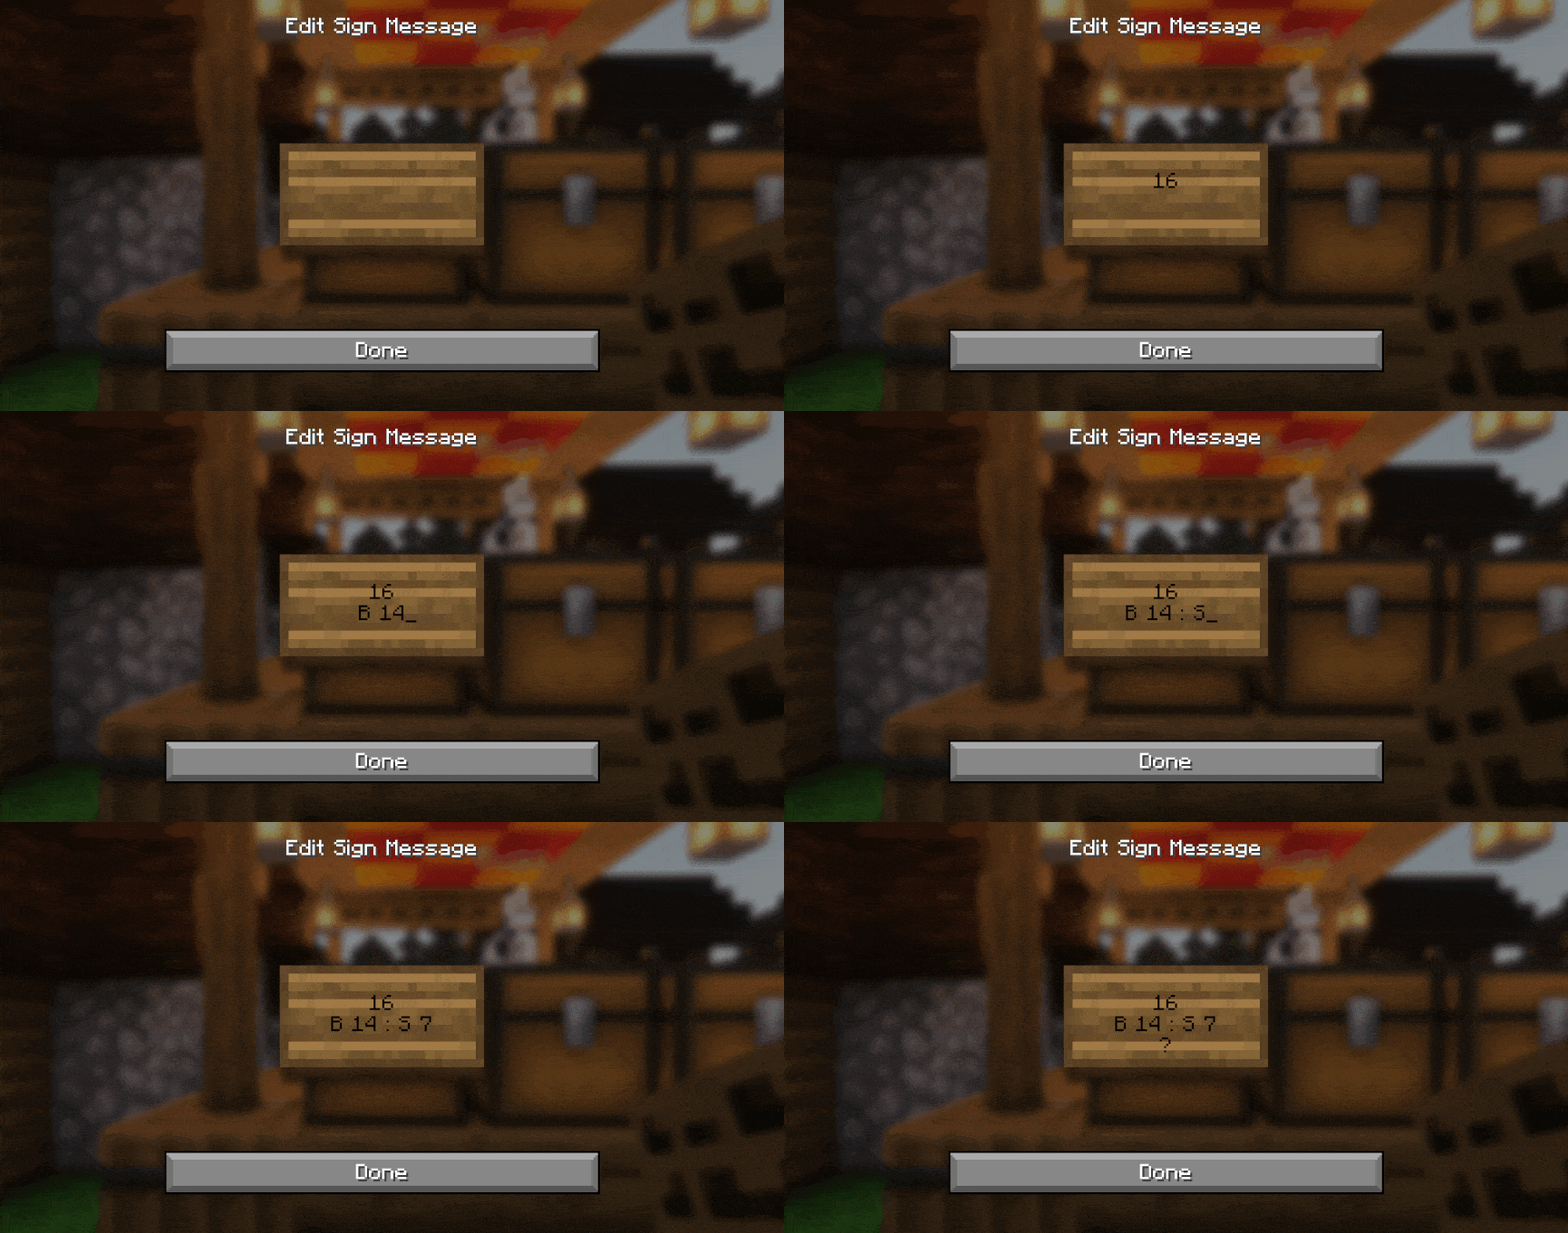
- Leave the first line empty. It will be automatically filled with your name by the plugin (if you have the permission ChestShop.admin then you can create shops with the names of other players)
- Second line is the amount of items to buy or sell
- Third line is a combination of buy and sell prices. You need to have a price indicator (like 'B' - price that will apply to items BOUGHT by PLAYERS - or 'S' - the SELL price) near the price - the prices are separated by a colon :
Some of the possible price combinations: "B 5:5 S", "B 5", "S free" - The forth line will hold the id/name of the item. Write ? on the sign and the item will be autofilled with the one from the chest or you can click on the sign with the item afterwards.
Optionally you can put the actual name of the item on the forth line. You can find out the name of the item that you're holding by running /iteminfo
Resulting shop:
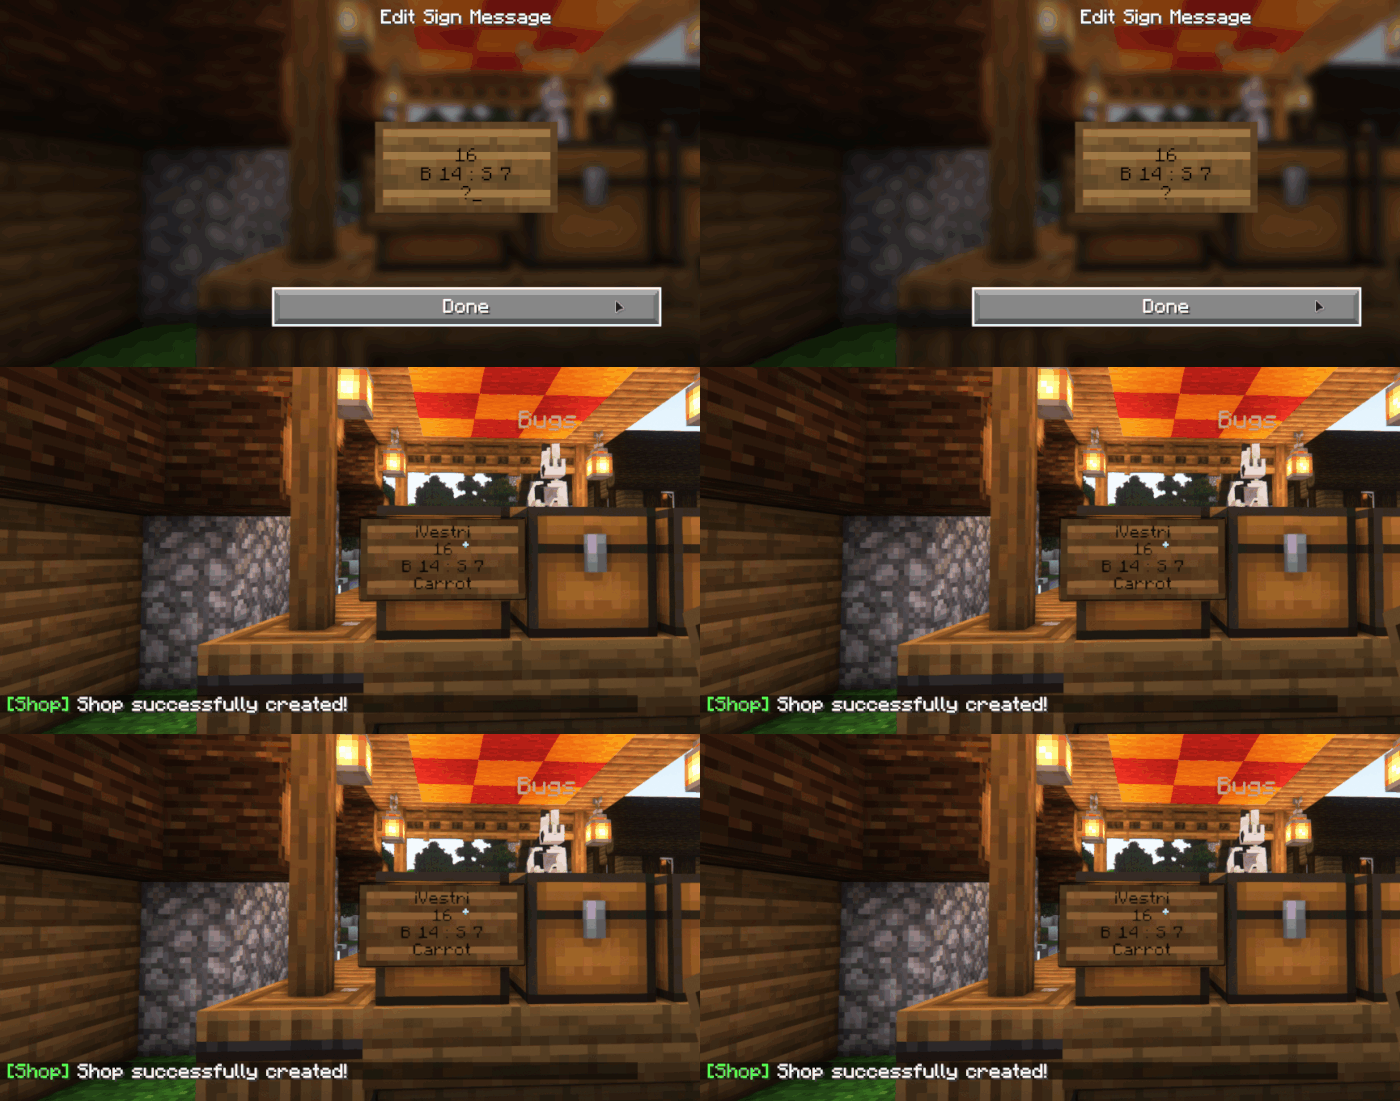
If you want you can also take a look at this video tutorial.
Inline Formatting
| Description | Syntax | Preview | More Info |
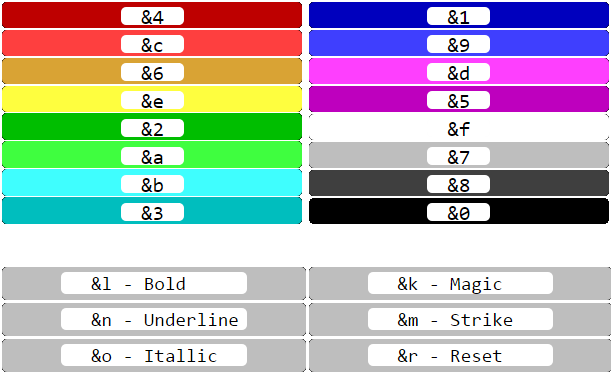
| Color legacy | &6Text |
 |
Formatting codes |
| Color | &gold&Text |
 |
Color names |
| RGB Hex Color | &#ff00ff&Text |
 |
Full hexadecimal format |
| RGB Hex Color | &#f0f&Text |
 |
Short format (equivalent to long one) |
| Gradient | &#f0f-#fff&Text |
 |
Inline gradients |
| Rainbow | &rainbow&Text |
 |
Inline Rainbow |
| Rainbow Phase | &rainbow:20&Text |
 |
Inline Rainbow with a phase |
| Bold | **Text** |
 |
|
| Italic | ##Text## |
 |
|
| Underlined | __Text__ |
 |
|
| Strikethrough | ~~Text~~ |
 |
|
| Obfuscated | ??Text?? |
 |
SpigotMC Link: MobsToEggs

USAGE:
Throw the catch capsule projectile defined in the config(Chicken Eggs) at the mob you want to catch, and it will have a 100% chance to be encapsulated into the Corrisponding mob egg.
(Note: Egging Breeze's is currently unsupported)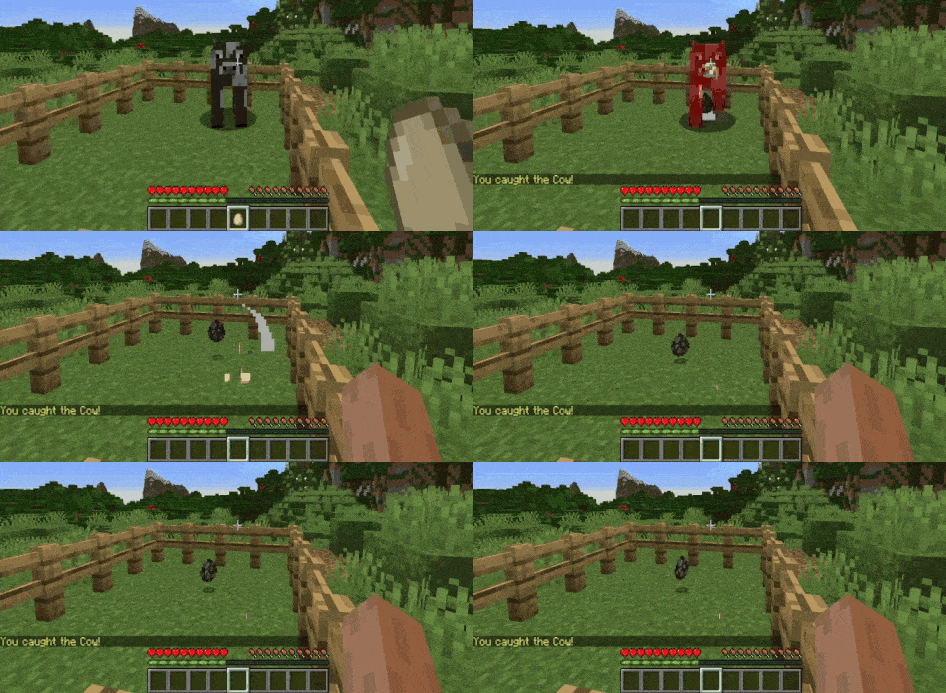
BG-Software: Wild Buster Wiki
Overview
WildBuster brings a new block to the game called "Chunk-Buster". This block can bust entire chunks in a moment without causing any lag to the server!
Parameters inside <> are required, unlike parameters in [] which are optional.
Cancel your active chunk busters.
player-name: The name of the player to cancel a buster for. The buster that will be cancelled is the buster that the player gets notification about.
chunk: The chunk to cancel from being busted. The format for the chunk is <world-name>,<x>,<z>.
There are 4 different disguise commands provided in the plugin. They differ in what gets disguised.
In addition, there are 4 different types of disguises which you can input using the disguise commands. Each of the types is available in every command.
Here are the 4 types:
Mob Disguise
You are now disguising as a cow.
Available mobs:
You can usually customize it with extra parameters (see below).
Player Disguise
You have constructed a player disguise which is called libraryaddict. You will show up with that name and skin.
&-color codes are accepted.
Use quotation marks " to put a space in the name, if you want to use multiple spaces in a row, to bypass the command limits that trims those spaces, escape the spaces with a backslash.
Example: /d player "The Green Apple"
Example: /d player "The \ Green \ Apple"
Misc Disguise
You are now disguised as a falling block, default uses the id stone.
Available misc disguises:
Note that these disguises, in general, are more prone to instability. Currently, you may not disguise as an item frame.
Alias Disguise
This command will take whatever libraryaddict is disguised as and apply it to you. (You need the 'libsdisguises.disguise.disguiseclone' permission to do this.)
Primary Disguise Options
Almost every disguise has options to customize or change it in some way.
For mob disguises:
/disguise cow baby
/disguise cow adult
You can set whether the mob is a baby or adult. This may not work with all disguises.
For the falling block disguise, provide 1 or 2 numbers. The first number is the block ID, and the second number is the block data. For example:
You are now disguised as birch planks.
For the 'painting' and 'splash_potion' disguises, you can also provide a number (art ID and raw potion damage value), but using the long form, detailed in the next section, is recommended.
Extra Disguise Options
You can set additional options on the disguises to do more stuff on them.
View the options using /disguisehelp <disguisetype>.
You can also view more information on types using /disguisehelp
The option types are
Number - A whole number. Examples: 5, 100, -32
Decimal - A decimal number. Examples: 5, 103.15, -78.6
String - A string. Examples: foo, bAr, hello
True/False - True or false.
Item - An item ID, and maybe damage. Examples: 46, 5:1, 32:13
AnimalColor - A wool color. Run /dhelp AnimalColors for valid values.
PotionEffect - The id or name of a potion effect. Run /dhelp PotionEffect for valid values.
HorseColor - The color of a horse disguise. Run /dhelp HorseColors for valid values.
HorseStyle - The style of a horse disguise. Run /dhelp HorseStyles for valid values.
Ocelot type - The ocelot type. Run /dhelp OcelotTypes for valid values.
Painting art - Which painting to show. Run /dhelp Art for valid values.
Villager Profession - The type of villager (their clothing color). Run /dhelp Professions for valid values.
Examples:
Invisible powered Creeper
/disguise creeper setPowered true setInvisible true
Brown horse with white spots and gold armor
/disguise horse setColor brown setStyle white_dots setHorseArmor 418
Upside-down player disguise with Notch's skin
/disguise player Dinnerbone setSkin Notch
Note that there is a permission for every extra setting you can add. The permission node is the base permission for the command, followed by the disguise name, followed by the "parameter name" (e.g. setPowered), in all lowercase. Example: libsdisguises.disguiseradius.creeper.setpowered .
Command /disguise(top)
This command will disguise yourself.
Permission node base: "libsdisguises.disguise.*"
(Remember, "libsdisguises.disguise.*" will allow all disguises on yourself, and "libsdisguises.disguise.<disguise>.*" will allow all options for that disguise on yourself. This is the same for all 4 commands - just the 'disguise' part changes.)
The command aliases are /dis and /d.
Command usage: /disguise <disguise string>
See above for examples of what a disguise string is.
Command /disguiseentity(top)
This command will disguise the next entity you right-click (within the next 10 seconds) to the disguise you specify.
Permission node base: "libsdisguises.disguiseentity.*"
The command aliases are /dentity and /disentity.
Command usage: /disguiseentity <disguise string>
Command /disguiseplayer(top)
This command will disguise another player. They are not notified.
Permission node base: "libsdisguises.disguiseplayer.*"
The command aliases are /dplayer and /displayer.
Command usage: /disguiseplayer <other player> <disguise string>
Again, see above for examples of what a disguise string is.
Command /disguiseradius(top)
This command will disguise all entities in the specified radius around you to the same disguise.
Permission node base: "libsdisguises.disguiseradius.*"
The command aliases are /dradius and /disradius.
Command usage: /disguiseradius <radius (blocks)> <disguise string>
Again, see above for examples of what a disguise string is.
Command Undisguise(top)
Use this to slip out of your clingy disguise!
Permission: "libsdisguises.undisguise"
The command aliases are /u and /undis
Command usage: /undisguise
Command UndisguiseEntity(top)
Use this to undisguise the next entity you right click!
Permission: "libsdisguises.undisguiseentity"
The command aliases are /undisentity and /undentity
Command usage: /undisguiseentity
Command UndisguisePlayer(top)
Use this to undisguise the player of your choosing!
Permission: "libsdisguises.undisguiseplayer"
The command aliases are /undisplayer and /undplayer
Command usage: /undisguiseplayer <Playername>
Command UndisguiseRadius(top)
Use this to undisguise all entitys in a radius around you!
Permission: "libsdisguises.undisguiseradius"
The command aliases are /undisradius and /undradius
Command usage: /undisguiseradius <Radius Size>
Command DisguiseViewSelf(top)
Use this to toggle the disguise model that appears when you disguise.
Permission: "libsdisguises.seecmd.viewself"
Aliases: dviewself, dvs, disguisevs, disvs, vsd, viewselfdisguise, viewselfd
Command usage: /disguiseviewself
Command LibsDisguises(top)
Use this to reload libsdisguises and other helpful functions
Command usage: /libsdisguises reload / scoreboard / permtest / json / metainfo / config / mods / count / update
Command DisguiseHelp(top)
Use this to fetch more information on constructing a disguise.
You need the permission to use at least one disguise.
Command aliases are /dishelp and /dhelp
Command usage: /disguisehelp <DisguiseType>
Command usage: /disguisehelp AnimalColor
Command usage: /disguisehelp HorseColor
Command usage: /disguisehelp HorseStyle
Command usage: /disguisehelp OcelotType
Command usage: /disguisehelp Profession
Command usage: /disguisehelp PotionEffect
Command CopyDisguise(top)
Use this to output a disguise to string, this string is usable in a /disguise command.
If used on a player disguise, two messages will be sent with the skin data, and without.
You need the permission: libsdisguises.copydisguise
Command aliases are: /disguisecopy, /disgcopy, /dcopy, /copydisg and copyd
Command Usage: /copydisguise
Command Usage: /copydisguise <Player Name or UUID>
Command GrabSkin(top)
Use this to upload a skin from a file, from an url or from an existing player name or uuid.
This will download the skin and save it as a file, as well as provide the skin data in a message.
If uploaded from a file, the file must have a .png extension and be located in your "skins" folder of the Libs Disguises plugin folder.
The plugin will generate a name automatically if possible, or save as 'Skin1' etc.
You can also define a name to save as by adding it as a second parameter.
If you want the slim Alex model version of a slim, add :slim to your skin information. Such as myskin.png:slim
You need the permission: libsdisguises.grabskin
Command aliases are: /uploadskin and /skin
Command Usage: /grabskin https://www.site.com/notch.png
Command Usage: /grabskin notch.png
Command Usage: /grabskin notch.png:slim
Command Usage: /grabskin Notch
Command Usage: /grabskin a149f81b-f784-4f89-87c5-54afdd4db533
Command Usage: /grabskin <Parameter> <Name to Save As>
Command Save Disguise(top)
This lets you save a disguise as a custom disgiuse in the disguises.yml provided by Lib's Disguises.
This means you can then in the future reference this disguise by name, such as /disguise IncrediblyComplexDisguise or in Mythic Mobs.
The first argument is the disguise name, the following is the disguise data. If doing a player disguise, the plugin will attempt to set skin data on 'setSkin'. So if absent, 'setSkin' will be added with skin data, if present. The skin name will be parsed and parsed into skin data if possible.
You will never get a skinless disguise saved if all goes well. This is to increase performance and stability for keeping skins the same.
If you want the slim Alex model version of a slim, add :slim to your skin information. Such as myskin.png:slim
You need the permission: libsdisguises.savedisguise
Command aliases are: /customdisguise, /createdisguise, /createdisg, /savedisg and /customdisg
For reference, "Notch" is a player name. You can make it "Dinnerbone", or "libraryaddict" or "DemonSlayer9000" if you want.
Command Usage: /savedisguise DisguiseName <Disguise Data>
Command Usage: /savedisguise BabyCow cow setbaby
Command Usage: /savedisguise Notch player Notch setglowing
Command Usage: /savedisguise Notch player Notch setglowing
Command Usage: /savedisguise Notch player Notch setSkin herobrine.png
Command Usage: /savedisguise Notch player Notch setSkin herobrine.png:slim
Command Usage: /savedisguise Notch player Notch setglowing setSkin Herobrine
Command Usage: /savedisguise Notch player Notch setglowing setSkin a149f81b-f784-4f89-87c5-54afdd4db533
Command Usage: /savedisguise Notch player Notch setglowing setSkin https://www.site.com/herobrine.png
Placeholders(top)
Placeholders are used to replace stuff in the disguise string as its provided. This is not compatibility support for PlaceHolderAPI.
There are three versions of each placeholder you can use. The normal version. A version with a player name, and a version with target provided.
The normal version uses the command sender for its placeholder replacements.
The player name uses that player if online for the placeholder replacements.
The target uses the entity being used for the disguise, for the placeholder replacements.
%name%
%displayname%
%skin% - Only valid if entity used for placeholders is a player
%held-item%
%offhand-item%
%armor%
%helmet%
%chestplate%
%leggings%
%boots%
If using a target. Then just prepend 'target-'
So %held-item% turns into %target-held-item%
The same for players.
%libraryaddict-held-item%
Possible Mob Disguises are: (Additional mobs probably work as well if they are unlisted)
ARMOR_STAND
ARROW
BAT
BEE
BLAZE
BOAT
CAT
CAVE_SPIDER
CHICKEN
COD
COW
CREEPER
DOLPHIN
DONKEY
DRAGON_FIREBALL
DROWNED
DROPPED_ITEM
EGG
ELDER_GUARDIAN
ENDER_CRYSTAL
ENDER_DRAGON
ENDER_PEARL
ENDER_SIGNAL
ENDERMAN
ENDERMITE
EVOKER
EVOKER_FANGS
EXPERIENCE_ORB
FALLING_BLOCK
FIREBALL
FIREWORK
FISHING_HOOK
FOX
GHAST
GIANT
GUARDIAN
HORSE
HUSK
ILLUSIONER
IRON_GOLEM
ITEM_FRAME
LLAMA
LLAMA_SPIT
LEASH_HITCH
MAGMA_CUBE
MINECART
MINECART_CHEST
MINECART_COMMAND
MINECART_FURNACE
MINECART_HOPPER
MINECART_MOB_SPAWNER
MINECART_TNT
MULE
MUSHROOM_COW
OCELOT
PAINTING
PANDA
PARROT
PHANTOM
PIG
PIG_ZOMBIE
PILLAGER
PLAYER
POLAR_BEAR
PRIMED_TNT
PUFFERFISH
RABBIT
RAVAGER
SALMON
SHEEP
SHULKER
SHULKER_BULLET
SILVERFISH
SKELETON
SKELETON_HORSE
SLIME
SMALL_FIREBALL
SNOWBALL
SNOWMAN
SPECTRAL_ARROW
SPIDER
SPLASH_POTION
SQUID
STRAY
THROWN_EXP_BOTTLE
TRIDENT
TRADER_LLAMA
TROPICAL_FISH
TURTLE
ZOMBIE_HORSE
UNKNOWN
VEX
VILLAGER
VINDICATOR
WANDERING_TRADER
WITCH
WITHER
WITHER_SKELETON
WITHER_SKULL
WOLF
ZOMBIE
ZOMBIE_VILLAGER